Editing Data in the UI
How to view, navigate, and edit card data directly inside the Board Game Builder template editor.
Editing Data in the UI
Board Game Builder lets you view and edit your card data directly in the editor without switching back to Google Sheets. The sample data panel shows the values for the currently previewed card row.
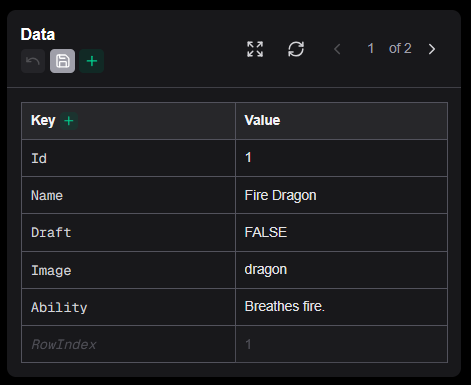
Sample data panel
The sample data panel appears in the editors right panel below the render preview. It lists every column from your connected spreadsheet and the corresponding value for the current row.
It has a / button to move it into the center panel for when you want to primarily work on the data instead of the template.
Next to that is a button to reload the data from the spreadsheet. This is useful if you prefer to edit the data directly in the spreadsheet or have advanced functions there.
Row navigator
The row navigator above the card preview lets you step through the data rows one by one. Use the left/right arrow buttons to go to the previous or next row. The current row number and total row count are displayed between the arrows.
Changing the active row immediately re-renders the preview using the new row's data, allowing you to check that your template looks correct across different cards.
Editing row values
Individual cell values can be edited directly in the sample data panel. Click on any value to open an inline text editor. Changes are applied immediately to the preview — this is useful for testing edge cases like long names, missing images, or extreme numeric values without modifying your actual spreadsheet.
Editing column names
Column names (the Key column in the sample data panel) are editable text inputs. Click directly on a column name to rename it. The change is applied to the live preview immediately and the cell is highlighted in blue to indicate a pending rename.
You can also add a brand-new column by clicking the button in the Key column header. A new row named NewColumn (or NewColumn1, NewColumn2, … if the name is already taken) is appended to the table. Click its name to rename it, then fill in the values for each row before saving.
All column renames and new columns are written back to the connected Google Sheet when you click the Save button — the header row in the sheet is updated accordingly.
Adding new rows
Click the button in the data panel header (next to the Undo and Save buttons) to append a blank row. All columns are initialised with empty values and the row navigator jumps to the new row automatically so you can start filling in the data.
Fill in the values using the inline cell editors, then click Save to write the new row to your connected Google Sheet. Until you save, the new row only exists locally in the editor and is not reflected in the spreadsheet.